

Game Engine Tutorial Series Part 1: Introduction
•
10 min read
Creating your own video game is the dream of almost any kid, gamer or software developer such as myself. It's really easy to accomplish using a professional game engine like Unity or Unreal Engine, but understanding what's happening under the hood of a game engine is quite tough, as there is an enormous amount of information required. To make it easier, I've decided to start this introductory series, so we'll be exploring how to write a simple engine for a hobby game project (yeah, I know, seems like reinventing the wheel, haha). In this part we'll create a game, where you can move a rectangular character using W, A, S and D buttons.
What is a game engine?
So, "game engine", huh. What do you actually imagine when hearing that term? Is it a library, a tool or maybe an IDE? In fact it's all of them. The simplest one would be in the form of a library and the most sophisticated solution is in the IDE form. There is even a game in which you can write other games (that counts as a game engine). That's just mind-blowing, right?
Most engines have very complicated architectures with lots of modules and submodules. Learning about them can be overwhelming, so why do we actually need engines? Well the primary reason is that most of the time we want to write a game.
Where do we start?
Before starting to write a game, let's answer the following question: what does it need? A game requires a way to represent the game world data, e.g.:
- environment assets
- characters
- audio
- user interface
A solid game also needs interactivity, so it should be able to process the user's input through any media that we want, be it keyboard, mouse, gamepad, microphone to name a few.
All of this should be done real-time and the game loop will help accomplish that.
Game Loop 101
The game loop is a loop that controls the flow of the game program. It executes code on every iteration (frame), as long as the player hasn't closed the game. If a game is able to run the iteration 60 times per second, then we say the game runs at 60 frames per second (FPS). In each frame the game does the following:
- process all the inputs
- update the game world
- generate output
Other than the input media mentioned above, we can imagine a game receiving input over the network if we support online multiplayer for example. Or a game that uses the camera or GPS service. As for the output, it can be in the form of graphics, an audio clip, controller's force feedback, etc.
In our case, firstly, we will be detecting the user's keyboard input. Then the game will update the position of our character based on the input. And lastly we'll render it onto our screen. This is a very simple approach to get a game up and running in no time.
Essentials
For developing a game we need to set up our environment. My language of choice will be C++ as it is the primary game development language. One of the most popular IDEs for development with it is Visual Studio. As I'm on Windows I'll be going with Visual Studio Community Edition 2022 (for MacOS – Visual Studio Code). For source control we will use Git, it also provides a very useful feature called submodules, which we will utilize.
Windows
- Install Git following the instructions provided
- Download and install Visual Studio
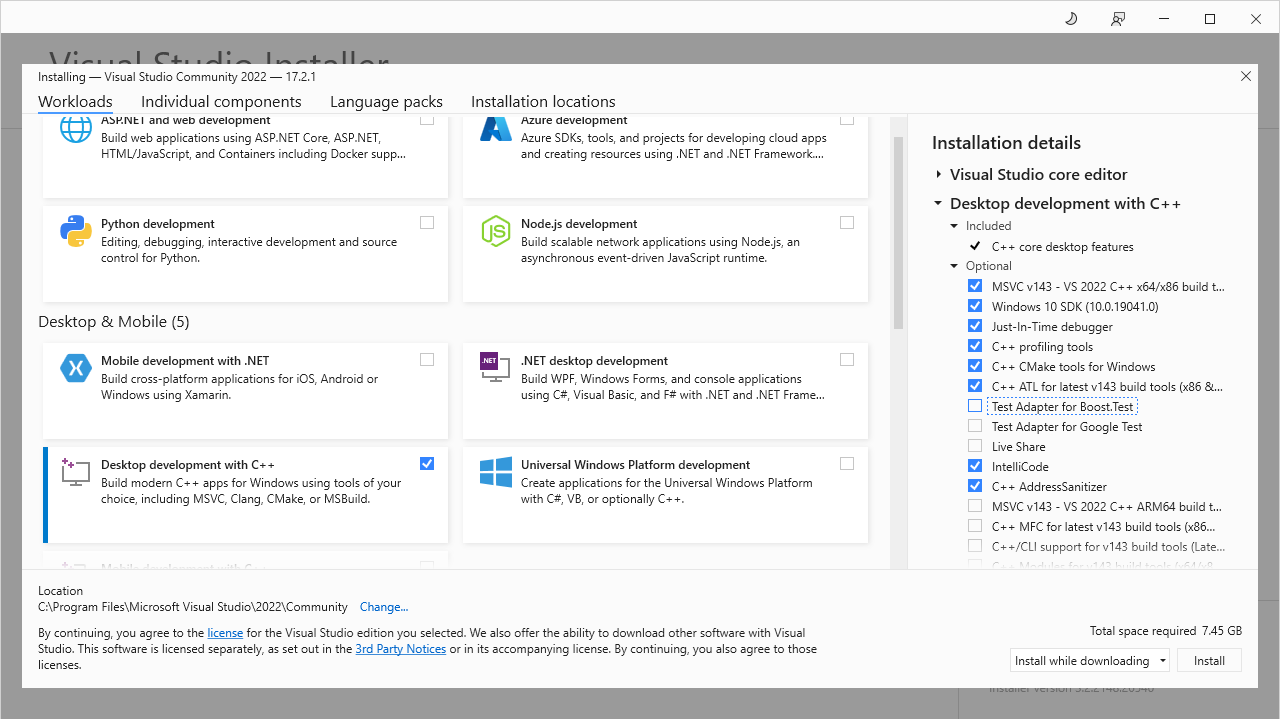
- In the windows for choosing workload, add Desktop development with C++
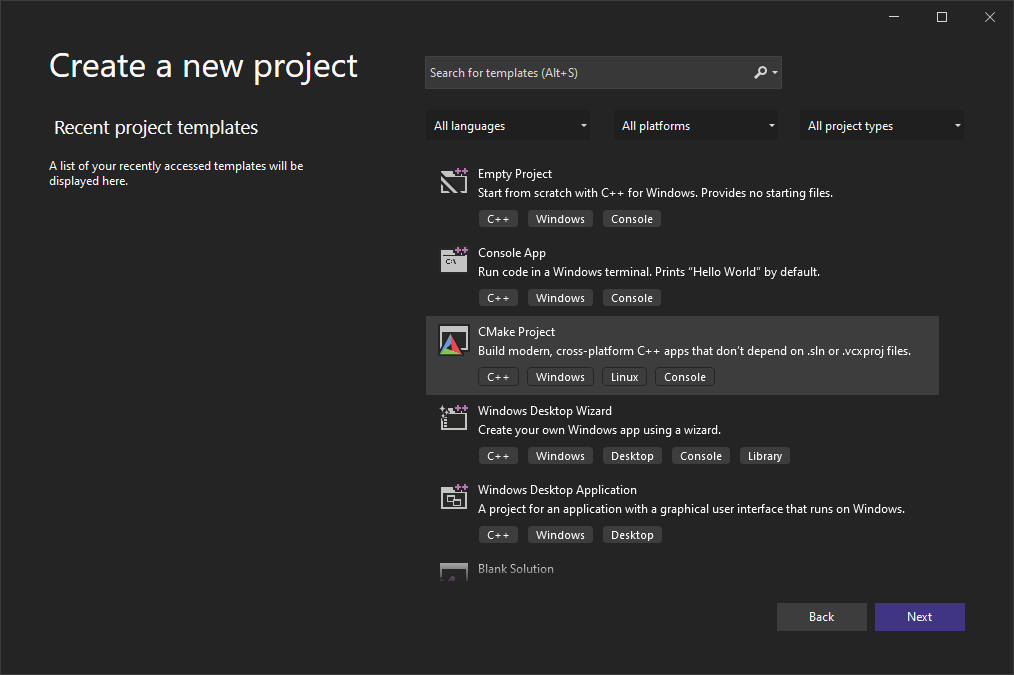
- Create a new CMake project
MacOS
- Install Git following the instructions provided
- Download and install Visual Studio Code
- In the extensions tab, install C/C++ Extension Pack
- Create a new CMake project following the instructions
- Rename main.cpp to game-engine.cpp
- Create a game-engine folder and put game-engine.cpp inside it
- Create a CMakeLists.txt file inside the game-engine folder and add the following:
# CMakeList.txt : CMake project for game-engine, include source and define
# project specific logic here.
#
cmake_minimum_required (VERSION 3.21)

# Add source to this project's executable.
add_executable (Engine "game-engine.cpp")
Unfortunately C++ Standard Library doesn't have any graphics-related libraries built in. For our purposes we should use an external library, such as SDL, which is cross-platform. That will help us make games for many different platforms. Using SDL we can get the user's input, and render our character on screen. Let's use git submodules feature to add SDL as a dependency repository, so that it is always up-to-date and we won't need to download specific files for each platform. This way the library is built for the platform we are developing on.
In the command line:
# Init Git repository
git init

# Create a folder for external dependencies
mkdir external
cd external

# Add the SDL submodule
git submodule add -b SDL2 https://github.com/libsdl-org/SDL
Next create a CMakeLists.txt inside the external folder and add the following:
add_library(external INTERFACE)

add_subdirectory(SDL)
target_link_libraries(external INTERFACE SDL2-static)
And in the root CMakeLists.txt we need to link the external libraries add the following:
# CMakeList.txt : Top-level CMake project file, do global configuration
# and include sub-projects here.
#
cmake_minimum_required (VERSION 3.21)

project (Engine VERSION 0.1)

# Include external dependencies
add_subdirectory (external)
# Include sub-projects.
add_subdirectory (game-engine)

target_link_libraries(Engine PRIVATE external)Note: In later chapters we will move to using other graphics APIs like Vulkan and Metal.
The source code for this tutorial series is available on GitHub at https://github.com/Snowblaze-Studio/game-engine. The final code for this part of the tutorial can be found under the tag "part-1-introduction".
Sample game
Let’s start with creating a Game class that will define the initialization and shutdown of our game, as well as starting the game loop.
Create a file Game.hpp with the following declaration.
#pragma once

#ifndef GAME_HPP // include guard
#define GAME_HPP

#include <SDL.h>

class Game
{
public:
	Game();

	// Initialize the game
	bool Initialize();

	// Run the game loop
	void RunLoop();

	// Cleanup and shut down the game
	void Shutdown();

private:
	void ProcessInput();

	void UpdateGame();

	void GenerateOutput();

	SDL_Window* mWindow;

	bool mIsRunning;
};

#endif
Most of the functions are self-explanatory. Initialize method initializes the game, RunLoop starts the loop and Shutdown shuts down the game. ProcessInput, UpdateGame, GenerateOutput are the three steps of the game loop. SDL_Window is the reference to the window in which our game will be shown and the boolean is used to determine if the game loop should continue to run.
Now let’s move on to implementing the functions in Game.cpp. The constructor initializes the window to nullptr and the boolean is set to true.
The Initialize function initializes the SDL library with SDL_Init function, which returns a number and if the number is a non-zero value, then the initialization has failed. If it failed then our function should return false.
bool Game::Initialize()
{
	// Initialize the library
	int sdlResult = SDL_Init(SDL_INIT_VIDEO);

	if (sdlResult != 0)
	{
		SDL_Log("Failed to initialize the library");

		return false;
	}
}
If the library initialized successfully, we move on to creating the window with the SDL_CreateWindow function. And we need to check if creation was successful. If it was then return true.
bool Game::Initialize()
{
	// Other code here...

	// Create the window
	mWindow = SDL_CreateWindow("Game Engine", 100, 100, 1024, 768, 0);

	if (!mWindow)
	{
		SDL_Log("Failed to create the window");

		return false;
	}

    return true;
}
In the Shutdown function we need to unload the resources, so first we destroy the window with the SDL_DestroyWindow function and then close SDL with the SDL_Quit function.
void Game::Shutdown()
{
	SDL_DestroyWindow(mWindow);
	SDL_Quit();
}
The RunLoop function runs until the mIsRunning boolean is true. We simply call the three functions representing the game loop steps.
void Game::RunLoop()
{
	while (mIsRunning)
	{
		ProcessInput();
		UpdateGame();
		GenerateOutput();
	}
}
Implement the game loop functions with an empty body for now.
void Game::ProcessInput() {}

void Game::UpdateGame() {}

void Game::GenerateOutput() {}
Now let’s create an instance of the game class in the entry point of our project (usually the main function).
#include "game-engine.hpp"
#include "Game.hpp"

using namespace std;

int main()
{
	Game game;

	bool success = game.Initialize();

	if (success)
	{
		game.RunLoop();
	}

	game.Shutdown();

	return 0;
}
Update the CMakeLists.txt in the game-engine folder to include the Game.hpp and Game.cpp files.
# CMakeList.txt : CMake project for game-engine, include source and define
# project specific logic here.
#
cmake_minimum_required (VERSION 3.21)

# Add source to this project's executable.
add_executable (Engine "game-engine.cpp" "Game.hpp" "Game.cpp")
Trying to run the project will fail on some platforms. That's because SDL is redefining our main function, which results in
LNK2019 unresolved external symbol _main referenced in function "int __cdecl invoke_main(void)" (?invoke_main@@YAHXZ)Adding #undef main before our main function and after including SDL will solve the issue
#include "game-engine.hpp"
#include "Game.hpp"

#undef main

using namespace std;

int main()
{
    // Same code here...
}
With this code in place, we can now run the project, although it will be a blank window for now. But we can’t quit the game now, because mIsRunning never changes. Let’s add input processing.
In any operating system (OS) a user can perform various actions on an application window:
- move
- minimize/maximize
- close
- resize
- etc.
When the user does any of these actions, the program receives events from the OS. SDL puts these events into a queue that can be polled. This queue stores events from input devices as well. It can contain multiple events on any frame, so we need to loop over all the events and process the ones we are interested in. Let’s implement this in the ProcessInput function using SDL_PollEvent function, which returns true if there is an event present in the queue.
void Game::ProcessInput()
{
	SDL_Event event;

	// Calling this function removes an event from the queue and stores it in the pointer
	while (SDL_PollEvent(&event))
	{

	}
}
Now let’s add a way to close the game, for example by pressing the close button, keyboard shortcut or the escape button. We can do that by checking the type member variable of the event.
void Game::ProcessInput()
{
	SDL_Event event;

	// Calling this function removes an event from the queue and stores it in the pointer
	while (SDL_PollEvent(&event))
	{
		switch (event.type)
		{
			// Event received when close button or keyboard shortcut is pressed
			case SDL_QUIT:
				mIsRunning = false;
				break;
		}
	}
}
For detecting the escape button press, we can use SDL_GetKeyboardState function, which returns a pointer to an array that contains the state of the keyboard.
void Game::ProcessInput()
{
	// Other code here...

	// Get the state of the keyboard
	const Uint8* state = SDL_GetKeyboardState(NULL);

	// Check if escape was pressed
	if (state[SDL_SCANCODE_ESCAPE])
	{
		mIsRunning = false;
	}
}
Now we can finally close the game with the methods written above.
Next step is drawing some graphics in the window. To explain in the simplest way, the screen is a two-dimensional grid of pixels. Every pixel has a corresponding value, which represents the color and intensity of the radiating light. These values are stored in an array that is called the color buffer. Whenever we are going to "generate output", we’ll be changing values in the color buffer. But this operation is not instantaneous, which will introduce screen tear - a state when some part of the displayed image is updated, while the other is not. To avoid this problem we can have two color buffers. While one of them is shown on the screen, we’ll update the second one, and swap them. This technique is called double buffering.
We’ve covered the minimal required theory for drawing something on the screen. Let’s constrain ourselves to showing a simple rectangular object that moves when pressing W, A, S or D buttons on the keyboard.
Other than input processing, SDL can be used for drawing 2D graphics as well, but first we need a renderer (a system that draws graphics). First let’s add a reference to it in Game.hpp.
SDL_Renderer* mRenderer;And now we need to initialize it after creating the window, so it should be done in Game::Initialize function like so:
bool Game::Initialize()
{
    // Other code here...

	mRenderer = SDL_CreateRenderer(mWindow, -1, SDL_RENDERER_ACCELERATED | SDL_RENDERER_PRESENTVSYNC);

	if (!mRenderer)
	{
		SDL_Log("Failed to create renderer: %s", SDL_GetError());
		return false;
	}
}Note: SDL_CreateRenderer can fail like when creating a window.
Also we shouldn’t forget about cleaning up on shutdown:
void Game::Shutdown()
{
	SDL_DestroyRenderer(mRenderer);
	// Other code here...
}
To generate output we need to complete the following steps:
- Clear the back buffer to some color
- Draw the scene (environment, characters, etc.)
- Swap the front and back buffer
Implementing this in Game::GenerateOutput would be a good idea.
To clear the back buffer, we need to first specify the color with SDL_SetRenderDrawColor and then call SDL_RenderClear.
void Game::GenerateOutput()
{
	// Set color
	SDL_SetRenderDrawColor(mRenderer, 0, 0, 255, 255);

	// Clear the back buffer
	SDL_RenderClear(mRenderer);
}
This was only the first step. We’ll skip the next step (drawing the scene), and to swap the front and back buffers we’ll call SDL_RenderPresent.
void Game::GenerateOutput()
{
	// Other code here...

	// Swap the front and back buffers
	SDL_RenderPresent(mRenderer);
}
With this we have a window with a blue background color.
Now on to drawing our character. For that we’ll use SDL_RenderFillRect function, which draws a rectangle with the provided width and height at a specified position. But first we need to change the color with which SDL draws, so that we can see the character.
void Game::GenerateOutput()
{
	// Clear back buffer code

	// Set the character's color
	SDL_SetRenderDrawColor(mRenderer, 255, 255, 255, 255);

	// Draw the character
	SDL_Rect character{
		(1024.0f - 100.0f) / 2.0f,
		(768.0f - 100.0f) / 2.0f,
		100,
		100
	};
	SDL_RenderFillRect(mRenderer, &character);

	// Swap the front and back buffers code
}
When we run the application now, we can see a white rectangle in the center of the screen.
As we are going to change the character’s position in the UpdateGame function, let’s store it as a member variable in Game.hpp. Declare a Vector2 struct, which will represent a point in 2D space, and add a member variable for the character’s position.
#pragma once

#ifndef GAME_HPP // include guard
#define GAME_HPP

#include <SDL.h>

struct Vector2
{
	float x;
	float y;
};

class Game
{
	// Other code here...

	Vector2 mCharacterPos;
}

#endif
Now initialize it in the Initialize function
bool Game::Initialize()
{
	other code…

	mCharacterPos.x = (1024.0f - 100.0f) / 2.0f;
	mCharacterPos.y = (768.0f - 100.0f) / 2.0f;

	return true;
}
And to use the character’s position vector, let’s change the character drawing code:
void Game::GenerateOutput()
{
	// Clear back buffer code

	// Set the character's color
	SDL_SetRenderDrawColor(mRenderer, 255, 255, 255, 255);

	// Draw the character
	SDL_Rect character{
		static_cast<int>(mCharacterPos.x - 50),
		static_cast<int>(mCharacterPos.y - 50),
		100,
		100
	};
	SDL_RenderFillRect(mRenderer, &character);

	// Swap the front and back buffers code
}
Character’s movement is the only thing left to implement. To calculate how much should the character move in any direction, we should determine how much time elapsed since the last frame. Let's call that value delta time.
SDL provides a function named SDL_GetTicks that returns the number of milliseconds elapsed since the SDL_Init call. We can save the result of a previous frame in a variable and use it with the current one to calculate delta time.
Uint32 mTicksCount;Let's update our UpdateGame function:
void Game::UpdateGame()
{
	// Delta time is the difference in ticks from last frame
	// (converted to seconds)
	float deltaTime = (SDL_GetTicks() - mTicksCount) / 1000.0f;

	// Update tick counts (for next frame)
	mTicksCount = SDL_GetTicks();
}
It may seem like it will do the trick, but actually there is an issue when running the game with different frame rates, especially if the game relies on physics.
We can limit the FPS by forcing the game loop to wait until the required delta time is achieved. That is called frame limiting. So, if we want 60 FPS and the frame completes in 15ms, the game loop will wait 1.6ms to achieve 16.6ms (1000ms / 60 FPS).
SDL provides a function just for that.
void Game::UpdateGame()
{
	// Wait until 16ms has elapsed since last frame
	while (!SDL_TICKS_PASSED(SDL_GetTicks(), mTicksCount + 16));

	// Other code here...
}
This was only fixing the lower limit, but we still have to fix the upper limit. What if the device takes too long to process a frame or you paused the game at a breakpoint for debugging purposes and later unpaused. To fix this problem we can clamp the delta time.
void Game::UpdateGame()
{
	// Other code here...

	// Clamp maximum delta time value
	if (deltaTime > 0.05f)
	{
		deltaTime = 0.05f;
	}
}
Let's add a vector in Game.hpp for storing the movement direction of our character:
Vector2 mMovementDir;Now we can handle W, A, S, D keyboard buttons in the ProcessInput function and update the movement direction:
void Game::ProcessInput()
{
	// Other code here...

	mMovementDir.x = 0;
	mMovementDir.y = 0;

	if (state[SDL_SCANCODE_W])
		mMovementDir.y -= 1;

	if (state[SDL_SCANCODE_S])
		mMovementDir.y += 1;

	if (state[SDL_SCANCODE_A])
		mMovementDir.x -= 1;

	if (state[SDL_SCANCODE_D])
		mMovementDir.x += 1;
}
And finally we can update our character's position:
void Game::UpdateGame()
{
	// Other code here...

	mCharacterPos.y += mMovementDir.y * 300.0f * deltaTime;
	mCharacterPos.x += mMovementDir.x * 300.0f * deltaTime;
}
We got the character moving, but now it can go off the screen, so let's add boundaries:
void Game::UpdateGame()
{
	// Other code here...

	float minXPos = 100.0f / 2.0f;
	float minYPos = 100.0f / 2.0f;

	float maxXPos = 1024.0f - 100.0f / 2.0f;
	float maxYPos = 768.0f - 100.0f / 2.0f;

	if (mCharacterPos.x < minXPos)
	{
		mCharacterPos.x = minXPos;
	}
	else if (mCharacterPos.x > maxXPos)
	{
		mCharacterPos.x = maxXPos;
	}

	if (mCharacterPos.y < minYPos)
	{
		mCharacterPos.y = minYPos;
	}
	else if (mCharacterPos.y > maxYPos)
	{
		mCharacterPos.y = maxYPos;
	}
}
With this code in place we achieved this part's goal of drawing and controlling a rectangular character.
Closing
While this is a simple "Hello World"-like project, on this journey we will be developing the architecture of our engine and adding more features as we go. The next part will be about adding some simple physics.
Thanks for reading and if you have any thoughts/questions, I would love to hear them on twitter: @Snowblazed.